|
| The four wicking beds at the front of the house. |
I live in a sharehouse that we’re renting in Northcote. When I moved here in August 2011, the front yard consisted of a sizeable area of vacant concrete, and a carport. I'm not sure why it's all concrete, I guess such was the fashion of the day, but to me it wasn't very attractive or appealing, or an effective use of space! I'd much rather a green lawn, which would reduce the amount of radiant heat incident on our house, and also attenuate and soak up more water during rain, not to mention being more visually pleasing.
Better still, I'd rather a beautiful garden, preferably edible. "Grow food, not lawns", as they say. If I owned the house, I'd have wasted no time in ripping up the concrete, but as a tenant I worry that such a move may be beyond my rights! So six years later, in May 2017, the concrete front lawn is still there, however it's no longer vacant.
In around July 2015, probably inspired by the Students of Sustainability conference I attended that month, I had the idea of constructing a bunch of planter boxes there, figuring this would be a much better use of the space, not to mention much more aesthetically appealing. Having some existing knowledge on types of garden beds, I decided wicking beds were the way to go, being stand-alone, easy to water and efficient with water consumption. They would also allow me to go away on short trips during the warmer months (~a week or two) and the plants would still likely survive starting with a full reservoir of water beneath them. The other general benefit of a wicking bed is that they maintain a much more steady soil moisture profile compared to a conventional garden bed, which plants prefer.
So in this blog post I've outlined how I built my own wicking beds from scratch, in my typical frugal and environmentally conscious fashion. I currently have fifteen wicking beds on the property: four out the front, eleven out the back, including two in the greenhouse (which I’ve written a separate blog post on) and I'm pleased to say they're all working swimmingly! I haven't exhaustively described the steps and materials required as this can be found elsewhere on the internet or you can easily figure it out yourself, and I've linked some other useful sites. Instead I've given the gist of what I did and how I did it.
The first step was to procure the containing medium for the beds. Sometimes old bath tubs or tanks are used, but timber is also a typical choice. I love working with timber, and this material also enables customisability of the shape and size, so timber was my choice.
I didn't want to buy new timber because that would be expensive, and I figured I'd be able to reclaim enough discarded timber to build them without much trouble. Also given my current state of funemployment (I was working as an engineer at Melbourne Water until my contract ended in March 2015), I figured the latter option was superior as I had lots of time but no income.
I already had a bunch of timber I'd picked up from hard rubbish several months earlier. Some of it I'd used to construct a greenhouse out the back, but there was still some left over. Enough to build one large planter box, I estimated. However I wanted to build three large planter boxes and one smaller one out the front, so I needed a lot more timber.
So for a while, whenever I was riding my bike around the neighbourhood, I would keep an eye out for any timber (or even some old wardrobes, etc) that neighbours had discarded that I could use for the planter boxes.
On a ride back from a trip to Masters (on which I'd picked up some screws, brackets and clear plastic builders film) I'd spotted a trailer load full of old timber from a fence that had been pulled down. It was just five blocks up from my street. I wondered if the former owner wanted it. I assumed that it was most-likely destined for the tip, so I made a mental note to return leave a non-mental note on the trailer.
It wasn't until about 11 pm that night that I found myself with some time and remembered to do it. I drafted the note which read:
"Hi there,
If you don't want this timber, you're welcome to drop it off at 42 Christmas Street, Northcote. I could use it.
Ned - 0400735467"
Then I hopped on my bike, with note and sticky tape in hand (well...in my pocket) and rode up to Clyde St in Thornbury. When I pulled up in front of the trailer, there was a bloke in a 4WD ute who had also pulled up in front of the trailer just before me, and had just hopped out of his car. He seemed to be observing me so I called out to him "Hey...is this your timber?"
"Yeah, it is, why?"
"Oh, I was just about to leave a note actually, was wondering if you wanted it?"
"What do you want it for?" he asked.
"I'm looking for some timber to build some planter boxes out the front of my house...I live just down the road"
"The timber isn't great" he advised.
"Yeah, it should be fine for what I need, just for the sides of the boxes..."
"Oh, just like a cladding?" he jumped in.
"Yeah, that sort of thing" I agreed.
"You got time now?" he asked?
"Yeah...I'm free now"
"Let's do it then!" he replied.
So at 11:30 pm, he reversed his ute back to the trailer and hooked it up, made sure the load was secure, I threw my bike in the tray, hopped in the passenger seat, and we drove the five blocks to my place, with a load full of timber.
All four of my housemates were sleeping (Arthur, Marcos, Sarah and Cattie), so I didn't want to make too much noise. I suggested we just throw all the timber onto the nature strip, and I'd take care of it myself later. There seemed to be plenty of good timber in there, I was excited. It was quite serendipitous that I'd rocked up to the trailer at the same time he'd gotten there, and he'd been willing to drop it off.
 |
| The pile of old fencing timber after we unloaded it from the trailer onto the nature strip. September 9, 2015. |
The blokes name was Vincent, and we had a good yarn while we unloaded the trailer. He lived in Thornbury, and had been running the fencing business for three years. He now had a few young blokes working under him too. He used to be a graffiti artist who grew up in Footscray. He described how hard he worked, and how good his business was, a fairly premium business who prided itself on doing a quality job. He seemed like a good bloke.
We finished unloading the timber, and threw some of the smaller off-cuts back into the trailer. He gave me his business card before he left, and offered for me to call him if I had any surplus timber afterwards that I wanted him to pick up, or if I wanted any advice, or if I wanted any more timber fences.
I then spent the next hour or so struggling to move all of the timber into the front yard in a quiet manner, lest I wake up my housemates. It was pretty heavy lifting on my own, but I eventually moved it all there without mishap.
So then I had all the timber I expected I'd need to build the four planter boxes. And what's more, it would have all gone to waste otherwise, and I'd been able to get it all to my place without the need for my own car (which I didn't have!) When one relies solely on bicycle transport, carrying heavy things like timber can be problematic and/or slow. So this turned out to be perfect! And furthermore I also had a contact who worked in the area who would likely have more timber to give away if I needed it. Vincent mentioned that they normally dumped it at the tip somewhere up around Epping, and it cost them about $50 a load. It didn't concern Vincent much because the cost was already factored into his fee to the customer, but for me, given my waste averseness, I was happy about reclaiming it for something useful.
 |
| Old hardwood fences in the front yard and the concrete lawn where the beds were to be constructed. |
I spent the next year or so building the wicking beds - not full time of course, but just when I found the time and motivation. I’ll first describe how I built the first wicking bed, then I’ll move on to the rest of them.
So having the second-hand timber, the next step was to remove the nails. We didn't have a jemmy bar so I borrowed my elderly Greek neighbour George's jemmy bar. It took a while pull out all the nails and stack the timber.
 |
| Planing the timber using a hand plane. |
Next I cleaned up and planed the timber. Here it would have been handy to have an electric plane or a thicknesser because planing the timber by hand was quite a time-consuming process. I then measured out the space I had in the front yard, and thought about how the beds would fit, and how much space I wanted to leave between them, in order to determine the dimensions of the beds I wanted. I drew a plan up on paper. The lengths of timber I had also came into play. I decided on an internal depth of 600 mm, to have a reservoir of 300 mm and a soil depth of 300 mm.
The external frame dimensions were 2950 mm x 1340 mm x 700 mm.
I cut the timber to length, and then constructed the frame, fastening with screws. I used the fence posts for the wicking bed posts and the horizontal fence beams for horizontal beams on the wicking bed frame. I then constructed the walls using the fence palings. I then added the floor. The frame of the floor was constructed from untreated pine slats that I found in hard rubbish. Initially I figured untreated pine would be okay because it would stay dry under the wicking bed, but I'm not sure this is the case. It seems often to be damp under there due to rain splashing up off the ground, and rain water seeping down the sides of the bed, as well as water from the reservoir because the builders film on the sides didn’t come all the way up. In hindsight it would probably be better to use the hardwood or at least treated pine.
 |
| The external frame complete. |
 |
| Screwing on the walls. |
 |
| Walls complete. |
For the floor I used two large wardrobe doors which I found in a skip, and were made of particleboard. In order to protect the boards from moisture, I wrapped plastic which I'd found by the Cole's dumpster in Northcote around the boards and taped it on. This appears to be working so far, a year and a half on. Using the fence palings would also be a good option for the floor, and indeed that's what I used for all of my wicking beds after the second.
 |
| Particle boards for the floor, with plastic taped on for protection against moisture. |
 |
| Floor complete. |
With the walls and floors complete, I cut some carpet to shape to cover the internal walls and floor entirely. I found the carpet discarded in a skip not far away. It was a thin carpet which is ideal, as it serves the purpose of protecting the builders film from sharp things/protrusions while avoiding taking up any more space and adding any more weight than necessary.
 |
| First layer of carpet installed |
I bought a roll of 200 micrometer clear builders film from Masters (black is fine too of course), which I installed in the inside of the carpet. It was only 2 metres wide, and the internal width of the bed was about 1.2 metres, so that meant the film only came up 40 mm on the side walls. Ideally it would come up to the top.
 |
| Builders film installed. |
Next I installed a second layer of carpet on the inside of the plastic, up to a height of about 40 mm. The purpose of this layer is again to protect the plastic, from the rocks or whatever is used to fill the inside base layer of the bed, up to at least the level of the overflow.
 |
| Second layer of carpet installed. |
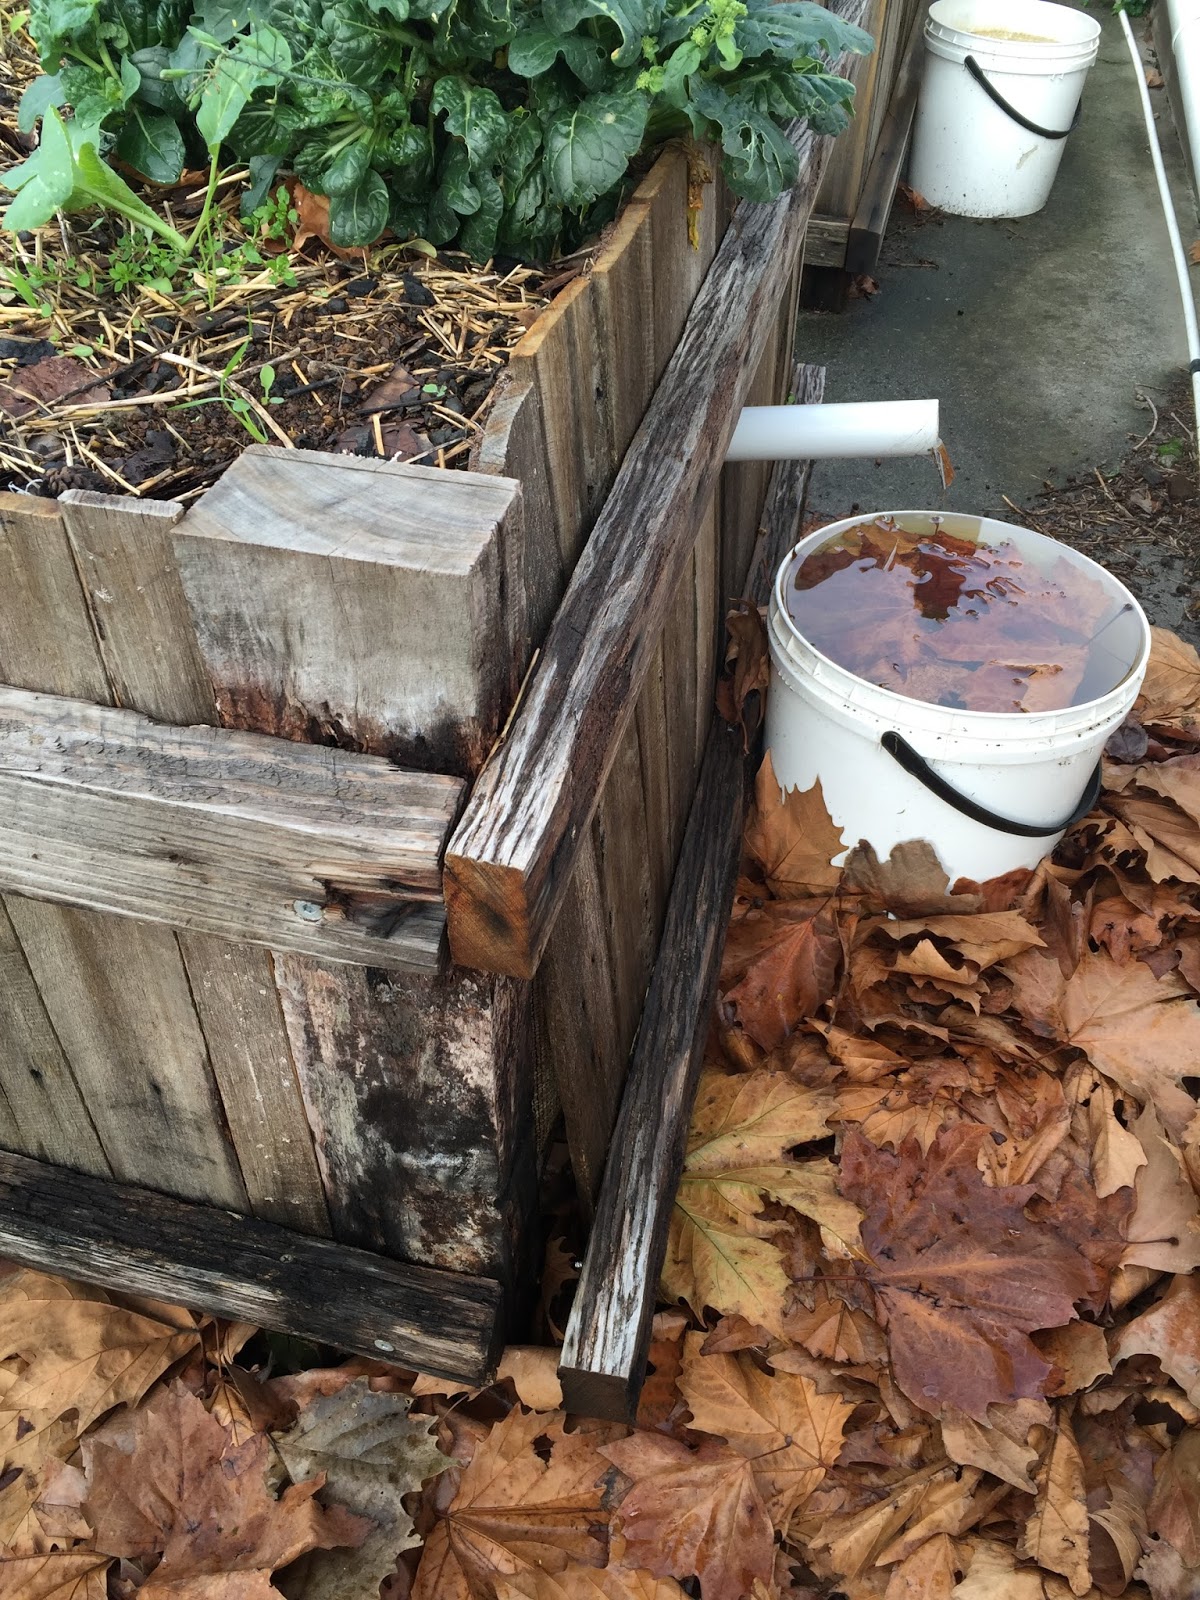
Building the overflow was the next step. I used a circular saw drill bit on the end of the drill to saw through a paling on the shorter side, with the base of the hole at a height of just above 300 mm from the internal base. I then inserted a short length of 50 mm PVC pipe and covered the internal end with drainage matting. I sealed the plastic around the pipe with duct tape.
 |
| Drilling/sawing a hole for the overflow. |
The bed was then ready to be filled. For the first bed I used volcanic rocks in the base layer. My Dad lives out at Mount Franklin and had some large piles of dirt left over from the construction of a fire bunker, so I’d sifted out the rocks from the soil and transported it down to Melbourne. The transportation was the difficult part because I didn’t (and still don’t) own a car. I relied on friends and sisters driving between Mount Franklin and Melbourne. I also borrowed my sister's little hatch back to transport materials from Dad’s.
 |
| The pile of dirt at my Dad's place, from which I sourced rocks and soil. |
 |
| Half a tonne of material that we towed down to Melbourne, thanks to my mate Jarrad! |
 |
| Overflow hole without the pipe. |
 |
| Overflow hole with the pipe. |
For the water inlet, I used a vertical piece of PVC pipe with an 88 degree bend attached to a horizontal length of agricultural (ag) pipe. I laid the ag pipe approximately halfway between the top and the bottom of the layer of rocks, that is, approximately 150 mm from the base.
 |
| My mate Sam giving me a hand. |
 |
| The bed partially filled with rocks. |
 |
| The bed filled up to half way (300 mm) with rocks, and water to test for leaks. |
Above the rocks I placed a layer of drainage matting which I bought from Masters. Then it was ready for the most important part of any garden - the soil. I was lucky to have a source of rich red volcanic soil, again from my Dad’s place -I just needed to transport it down to Melbourne. With this, I mixed in sheep poo from under the shearing shed at Dad’s house; compost from the back yard compost heap; used coffee grounds from the local cafes in Northcote; and, biochar (see a few paragraphs below). I mixed all of this together in large buckets and tipped it into the bed until it was full. It’s prudent to fill it to slightly above the height of the walls, because it will settle and compost over time, and the surface level will drop.
 |
| A layer of drainage matting laid over the rocks. |
 |
| Ingredients for the soil mix, anti-clockwise from top left: sheep poo, compost, biochar, coffee grounds, dirt. |
 |
| Mixing the soil components together in the buckets. |
 |
| Filling the bed with soil. |
 |
| Filling the bed with soil. |
 |
| Due to the length of the bed and pressure from the soil and water inside, I tied a guy rope across the centre to prevent the walls from splaying out. |
 |
| The first wicking bed full, with the second on the left in progress. |
To finish, I covered the surface in a thin layer of lucerne, from the hay shed at my Dad’s place. Then I planted it out with seedlings I’d raised in my micro greenhouses, with a row of tomatoes on the south side, and a row of zucchini and squash on the north side. The plants loved their new homes, and went gangbusters within weeks!
 |
| Wicking bed one complete! |
 |
| Wicking bed one planted out with seedlings: December 4, 2015. |
I built the rest of my wicking beds in a similar fashion but with a few notable differences. I was well underway in building the second one when I’d finished the first one. The second was slightly shorter because I’d already used up the longest beams of timber in the first bed so it’s external dimensions were 2850 mm x 1320 mm x 700 mm, but the frame, carpet and builders film were all essentially the same. The only real difference was that I used biochar in the base layer instead of rocks.
 |
| Another load of timber from Vincent. |
 |
| Filling the base layer with biochar. |
 |
| Biochar coming up to the overflow pipe. |
 |
| Filling the second bed with soil. |
 |
| The second bed full of soil. |
 |
| Second wicking bed complete! |
 |
| First and second wicking beds complete and planted out, also featuring my mate Al. |
 |
| First two wicking beds complete and planted out with seedlings. December 12, 2015. |
 |
| Plants growing: December 31, 2015. |
 |
| Plants growing: January 7, 2016. |
 |
| Plants growing: January 12, 2016. |
 |
| Plants growing:January 18,2016. |
 |
| Plants growing: February 13, 2016 (I was away bike touring in Tassie for a month and left my housemates to look after the garden. Unfortunately the squash/zucchini was hit hard by powdery mildew). |
 |
| Plants growing: February 23, 2016. |
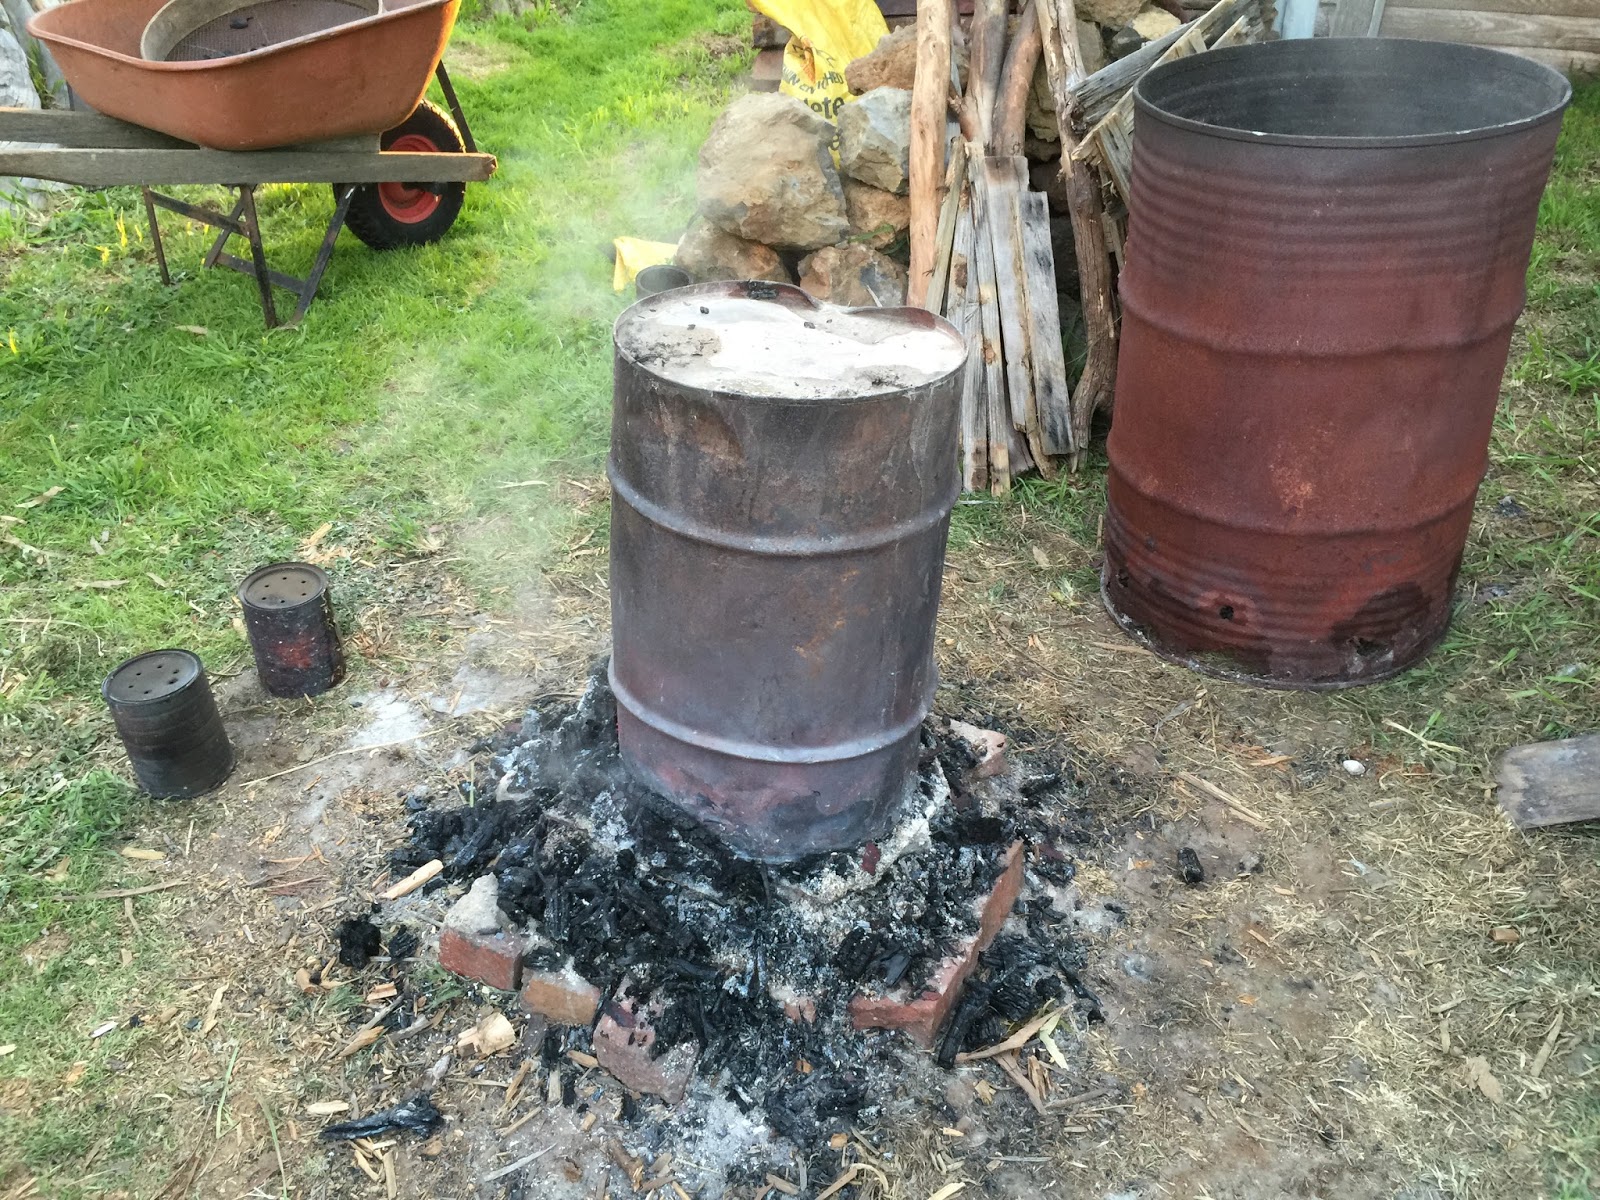
Some of the biochar I produced myself at my Dad’s place in Mount Franklin, and I’ve written a separate blog post on this which I’ve linked here:
Biochar Production. However I found the process of producing biochar myself using pyrolysis was a bit slow, so I came up with an alternative. I remembered that there was a recent major bushfire near Lancefield the previous summer, so I borrowed my sister's car with a pile of bags and a little garden fork, and drove out to the site of the bushfire. It wasn’t hard to find, everything being blackened still, and I simply parked the car on the side of the road and picked up charcoal by hand. This involved scraping it off burnt logs and stumps, as well as scraping it into little piles on the ground and bagging it all up. Working efficiently I found it took around half an hour to fill one bag.
 |
| Collecting biochar from the bushfire site near Lancefield. |
 |
| Collecting biochar from the bushfire site near Lancefield. |
The benefits of biochar over rocks are that it’s much lighter and therefore more efficient to transport, and easier if one has to move the beds at some point - a distinct possibility when one is living in a rental house. I also surmised that the biochar would provide a home for micro-organisms in the water, and the finer biochar that I’d sifted out would be an excellent addition to the soil mix.
Once I got the biochar home though, I then had to process it further by sifting out the fine particles of charcoal and dirt, as well as picking out all the leaves and sticks. This was to avoid clogging up the biochar so that water would be able to flow freely around it once it was in the bed base.
 |
| My friend Olivia helping out with sifting and cleaning the biochar. |
There was a gap between when I finished the second bed in December 2015 and when I started on the third bed in July 2016, due to other fun activities and life getting in the way.
 |
| My friend Virginie giving a hand screwing the floor joists in. |
The third bed was essentially the same as the second, though slightly shorter again as I was running out of longer pieces of timber: 2800 mm x 1330 mm x 700 mm for the external dimensions.
I used biochar as the base layer in this one, as well as all subsequent wicking beds I built. Most I collected from the bushfire site near Lancefield, and some I produced in my biochar retort in the back yard in Northcote.
 |
| Walls complete on wicking bed three. |
 |
| Floor complete on wicking bed three. |
 |
| Filling the base layer of wicking bed three with biochar. |
 |
| Wicking bed three complete. |
 |
| Wicking bed three planted out: October 25,2016. |
By the time I was filling the third bed with soil, I had a ready source of sawdust, which my housemate Virginie and I had picked up from a furniture building place down in Collingwood, who build furniture out of second-hand timber, and have bags of sawdust that they give away. I also had some wood-chips that I’d collected from the bush at the bushfire site near Lancefield, and so I added the wood chips and sawdust into the soil mix.
The fourth bed I constructed was a smaller square-based one, approximately 1330 mm x 1330 m, in order to fit the remaining space available in the front yard. Upon it’s completion, the decking out of the front yard with wicking beds was then finished. Next was the back-yard!
 |
| Frame and walls complete for wicking bed four. |
 |
| Filling the base layer of wicking bed four with biochar. |
 |
| Wicking bed four complete. |
 |
| Wicking bed four complete: November 20, 2016. |
I’d contacted my mate Vincent the fencer and gotten him to drop off another couple of loads of old hardwood fences. I constructed a total of nine wicking beds (excluding those in the greenhouse) in the back yard, mostly in a parallel fashion, as opposed to doing them serially for the front. I was confident enough with my method now, so I planed up lots of timber, then built all the frames, then built the walls. One thing I’d learned from the first two beds was that I needed to leave a significant gap between each of the fence palings on the walls to allow for expansion when they get wet. Some of the palings in the first two beds had buckled out and snapped the screws clean off under tension! At least five millimetres seems to be needed between wall palings. Even with my learning, some of palings in the newer wicking beds have still buckled - they’ll expand more than you think!
 |
| My friend Steph helping pull apart the old fence so we can re-use the timber for the beds. |
 |
| One of seven wicking beds I built at this size: frame and walls complete. |
 |
| Wicking bed frames, palings carpet all crammed in under the carport. |
I carried the beds into place in the back yard, chocked them up beneath with timber off-cuts so that they were level, then built the floors using fence palings.
 |
| Wicking beds in the back yard, yet to be filled. |
 |
| Wicking beds positioned in the back yard, ready to be filled. |
 |
| My housemates Charlie and Arthur chilling in the back yard. |
I then lined the insides with carpet or carpet underlay (from hard rubbish), builders film all the way to the top, and the second layer of carpet/underlay. Then I installed the overflow pipes using 40 mm PVC pipe. Instead of duct-taping around the pipes as I’d done for the first four beds out the front, I’d decided using a sealant would be more robust. I went to search for one in Bunnings.
 |
| Wicking beds in the backyard lined with carpet/underlay. |
This turned out to be more difficult than expected. Most of the sealants are not recommended for constant immersion. I eventually bought a tube of polyurethane for about $20 (not cheap), and used that to seal the pipe to the builders film. I’d also deliberately only cut small holes though the builders film and forced the pipe through it, such that film was already hugging the pipe pretty tightly.
 |
| Overflow pipe squeezed through the builders film, for the backyard wicking beds. |
 |
| Overflow pipe sealed with polyurethane sealant for the backyard wicking beds. |
 |
| Overflow pipes installed for the backyard wicking beds. |
I then added the biochar, drainage matting, and soil, topping it with lucerne, and planting them out with seedlings.
 |
| The backyard wicking beds, some of which are completed. |
 |
| Filling the wikcking beds in the backyard. |
 |
| Filling the wikcking beds in the backyard. |
 |
| Filling the wikcking beds in the backyard, and featuring me! |
 |
| Planting out the wicking beds in the backyard, with help from my housemate Virginie! |
 |
| The tenth wicking bed complete and planted out. |
 |
| The eleventh wicking bed complete. |
 |
| The eleventh wicking bed complete. |
 |
| Plants going wild in the backyard wicking beds. |
 |
| My housemate Marcos by the fire (biochar retort) surrounded by the new wicking beds out the back. |
 |
| All wicking beds in the backyard complete! |
 |
| The two smaller wicking beds on the back veranda planted out with herbs. |
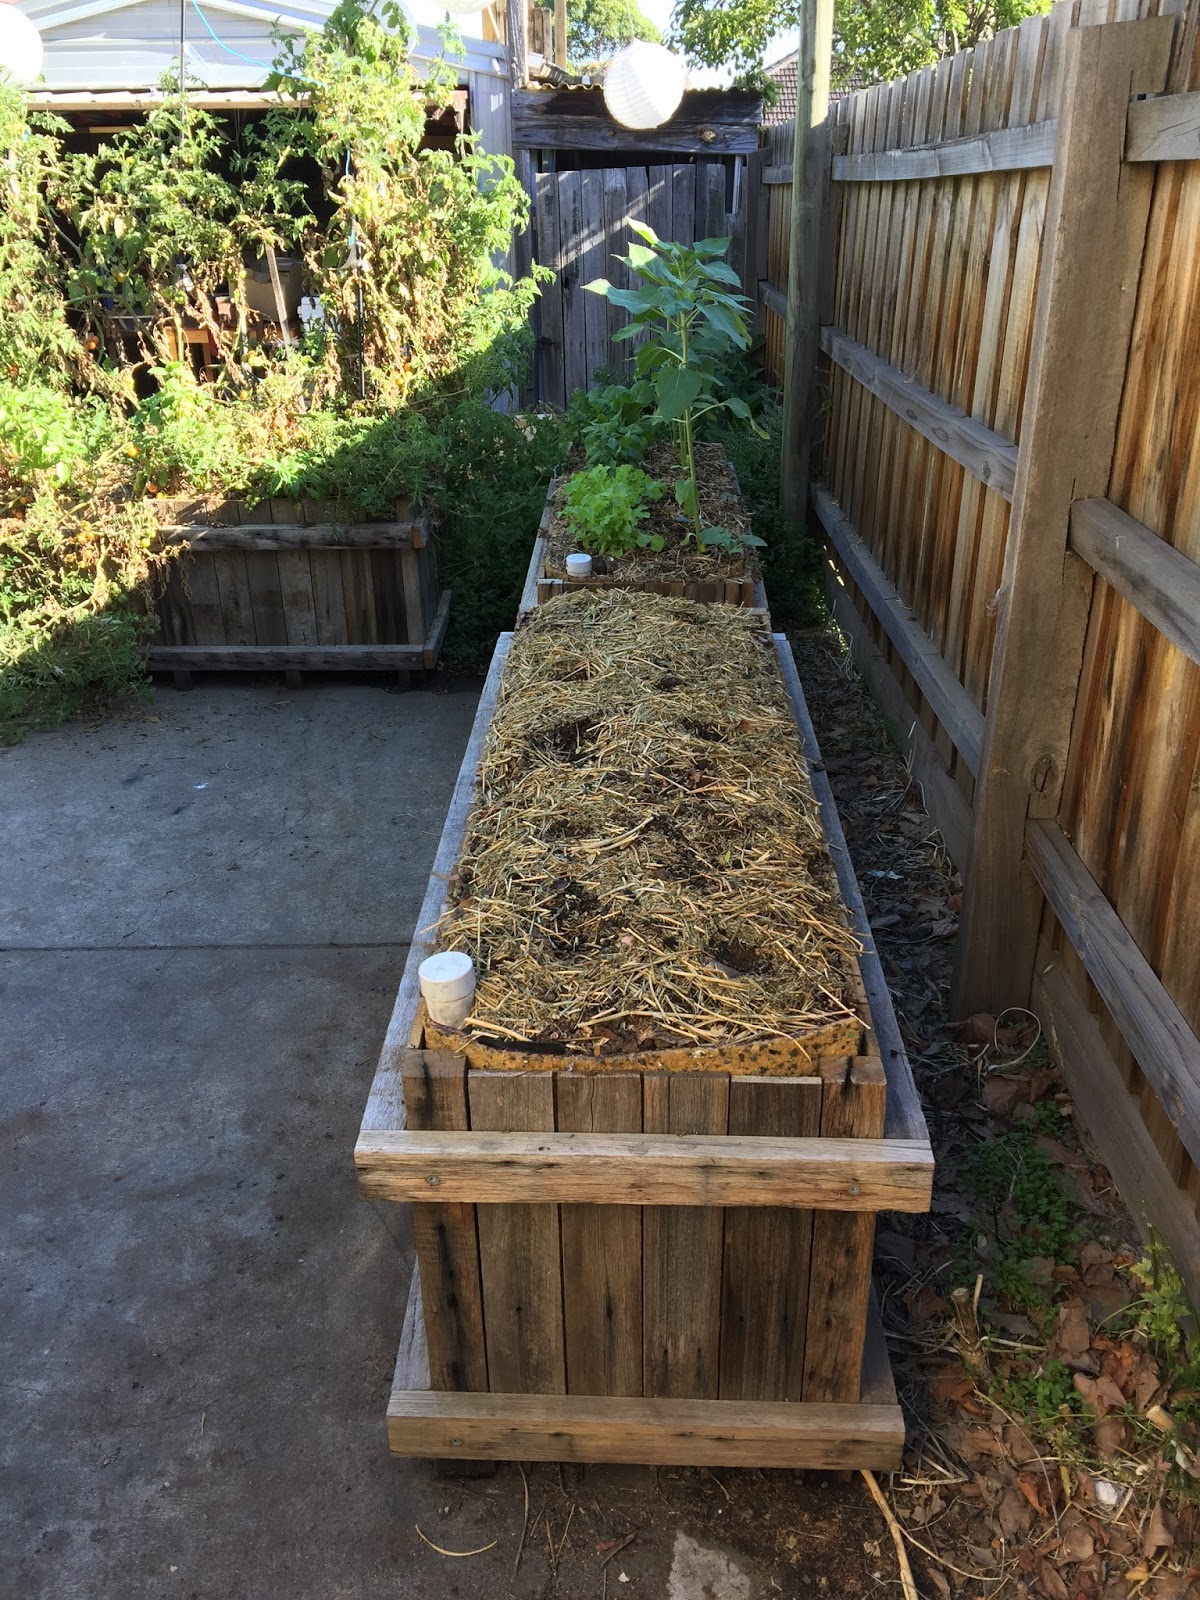
I built seven of the beds in the same dimensions: 600 mm high including the base of the frame, which meant the internal depth was around 500 mm; 600 mm wide; 1600 mm long (for the frame). The other two beds I built were smaller ones, customised to fit on the back veranda and designated for herbs. The external frame dimensions of these were 2010 mm long by 400 mm wide by 450 mm deep and 1150 mm long by 400 mm wide by 450 mm deep.
This completed kitting out the back yard with wicking beds, and created a lovely cosy feeling space. I was very happy with the results, as were my housemates as far as I could tell, and we’ve since had many delightful gatherings there.
The whole process of building the wicking beds was fairly trouble-free. It was time-consuming because I was working without deadlines, and cheaply and ethically sourcing materials as much as I could. Using second-hand timber added a substantial time cost in preparing the timber, though this could be sped-up using an electric plane/thicknesser instead of a hand-plane, or alternatively not worrying about cleaning up the timber. Using biochar also added a significant time cost in either producing it myself, or collecting it myself from the bush. Also my choice of materials for the soil mix took time because it meant collecting the dirt, sheep poo, coffee grounds, compost, biochar and saw dust by hand, and transporting that without the convenience of owning a car. My general thoroughness, attention to detail and desire for aesthetically beautiful beds also drew out the process - they could be built a lot quicker (and rougher) but still be functional.
The main problems that did arise were as follows:
- Due to not leaving enough space between fence palings, they buckled when they got wet, and even forced apart the frame on the first wicking bed. I replaced the smaller screws that had been broken with larger baton screws, and used the larger baton screws for subsequent beds (14 gauge, 100 mm)
- I covered the overflow pipe of the first two wicking beds with drainage matting. This turned out to be too fine a fabric and became clogged up before long and would not allow water to flow freely through it, which resulted in the water level rising too high in the bed, and then flowing over the sides of the plastic at about 400 mm internal depth. For all subsequent wicking beds I tied a small piece of fly-wire over the pipe end instead, and this worked well.
- The overflow pipe on the third wicking bed leaked at the base of it. I had to dig out around the pipe, peel off the tape and replace it with sealant.
 |
| The overflow pipe of wicking bed three, after resealing the failed duct-tape seal with polyurethane sealant. |
- The seal around overflow pipe on the twelfth wicking bed failed when I was trying to straighten the pipe. I dug out around it and found that the sealant wasn’t as reliable as I had expected, and peeled off the builders film surprisingly easily. I resealed it with the same sealant, but for future beds I would like to find a better sealant, or alternative sealing solution.
 |
| Failed polyurethane seal. |
 |
| Failed polyurethane seal. |
- Two of the beds (wicking bed four and five) did not harbour flourishing plants like the others, and I’m not sure why. My theories include that layer of biochar was too high such that the water level did not reach the base of the soil layer before overflowing through the overflow; positing/slack of sunlight; that the soil mix was too rich or unsuitable in some way, maybe the pH was too low (too acidic); that the soil components such as coffee grounds, sawdust and sheep poo were too raw and uncomposted, though it would be strange that the other beds succeeded with the same soil mix. If the beds continue not to perform, I’ll probably excavate and check the levels of the biochar versus overflow as a first step.
 |
| Wicking bed four in the fore-ground: the eggplant has done well, but nothing else has succeeded. |
- I was using the carport out the front for storing the timber. This is okay for short-term storage, but I constructed the wicking beds over more than a year and my housemate Arthur got pretty annoyed with all the timber staying there. Allegedly our landlords were also unhappy with the “mess”. With seven people in our sharehouse, storage space comes at a premium. I’m currently storing some timber under the house (not ideal because it’s difficult to access), and some behind the shed under a tarp (also not ideal as the timber is still getting wet).
- The manual filling of wicking beds is quicker than watering a garden in the traditional way, but is still a time-consuming task. Ideally I would have an automatic watering system hooked up to the mains, at least during summer. Though when we have rainwater in the tanks, I like to use that first to avoid using more mains water than necessary, so a more complicated automation system would be required to incorporate the rainwater.
Hopefully this gives you some ideas or inspiration for you to create your own wicking beds, or offers some guidance in building them. There are of course plenty of other resources online and elsewhere for building wicking beds, but I’ve done things my own way based on my situation, and I figure everyone does things slightly differently so learning other people's individual experiences can be useful. Feel free to get in touch if you want to know more!
Below is a list of resources I found useful (or you can simply Google “wicking beds” and most of these sites will come up near the top):
http://www.leafrootfruit.com.au/gardens/wicking-beds/
https://www.veryediblegardens.com.au/iveg/building-wicking-beds-in-melbourne/
https://www.wickingbeds.com.au/
https://www.abc.net.au/gardening/stories/s4010599.htm
http://www.waterright.com.au/wicking_bed_technology.pdf
https://permaculturenews.org/2011/06/20/from-the-bottom-up-a-diy-guide-to-wicking-beds/
https://www.milkwood.net/2010/05/11/how_to_make_a_wicking_bed/
https://pkozul.wordpress.com/gardening/wicking-beds/
http://www.sgaonline.org.au/wicking-beds/